Building a Bulb in PlayPosit 3.0
In this article
A comprehensive guide to building a bulb in PlayPosit 3.0, covering the basic and more advanced features of the Designer.
- What is a bulb?
- Insert a media
- Examine the video source URL
- Add multiple video clips to a bulb
- Reorder videos
- Upload or fetch captions
- Edit captions
- Trimming and cropping video
- Changing a video source
- Change a video name
- Insert interactions
- Types of interactions
- Interaction templates
- Template gallery
- Adding feedback
- Using interactions strategically
- When is the right time to use durational interactions
- Embed images, audio, attachments, equations, and tables
- Change the point value of a question
- Advanced interaction settings
- Stack questions together
- Bulb settings
- Bulb details
- Previewing a bulb
Want to make passive video an active, engaging experience for learners? Here's how!
What is a bulb?
A bulb is an interactive video created in PlayPosit. Transform any video into an active experience for students by embedding questions, images, audio, and other media elements. To start creating a new bulb, click Add New Bulb from the dashboard.

Insert a media
The PlayPosit Designer supports adding videos from various sources. You can select one of the sources from the list to insert media into the Bulb designer and create a Bulb with it.
- My Video: Videos you have used in other Bulbs can be found here.
- Input URL: Paste the link to your video here to insert it into the Bulb Designer. The link must be from the supported video sources.
- Upload video: Directly upload your video to PlayPosit. This option is only available for the institution that opts into HLS minutes or the Classroom Pro users. Please see this article for more information about HLS uploading in PlayPosit.
- Upload MP3: Upload an MP3 audio file to create a Bulb. This option is available for all users. When taking the Bulb built with an MP3 file, learners will see a blank screen and can listen to the uploaded audio with the PlayPosit player. The interactions will pop up for learners when they reach the selected timestamp, as in the usual interactive video.
- Record: Create a screen recording or record yourself with the webcam. This option is only available for institutions that opt into HLS minutes or Classroom Pro users.
- Supported Video Sources: Select the video source from the list and find the video you want to use from the selected source. YouTube and Vimeo are public video sources that are available to all users. The other video sources are premium private sources available to institutional license users.


Examine the video source URL
Please follow the steps below to examine the video segment source URL:
- Click the desired video segment.

- Find the video source URL.


If the video is uploaded to PlayPosit through the HLS, the instructor can find the full URL and will be able to download the video with that URL. If the video is imported from other video hosts, the source URL will display the last portion of the URL to help instructors identify and locate the video from the video hosts.

Add multiple video clips to a bulb
When you add multiple video clips to a single bulb, your students will experience a seamless video storyline experience. To add multiple videos within a bulb, follow these instructions:
- Click the Video Segments tab header and then click Add Video.

- Repeat the same steps as in the above section to finish setting up this video segment.
- You will see multiple videos in the list, and you will be able to scrub between the different videos on a single sidebar.

Reorder videos
Drag and drop videos from the Video Segments tab to rearrange the order. To rearrange videos:
Note: Interactions within a video segment will not move with that segment if it is reordered.
1. Toggle on Enable drag and drop reordering. 
2. Drag and drop the video in the correct order. 
3. Once complete, toggle off Enable drag and drop reordering. 
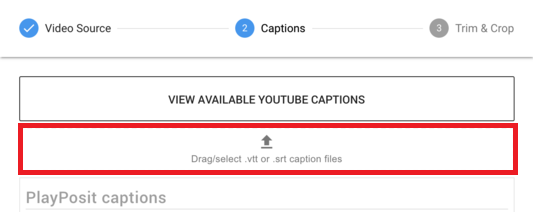
Upload or fetch captions
The PlayPosit 3.0 designer supports uploading .vtt and .srt caption files, as well as fetching caption files that are already attached to video streams from other media hosts, such as YouTube, Kaltura, and MediaSite.
Note: If you are part of an institutional license, all non-autogenerated captions will be automatically fetched, eliminating the need for manual retrieval. To enable live transcripts for YouTube videos, you must fetch captions.
Note: Free users do not have the ability to view and fetch available captions. Only captions available for the YouTube video will appear in PlayPosit.
- Switch to the Video Segments tab.
- Click the triple dots icon for the video you want to caption and select Edit Video Segment.
- Click Customize.
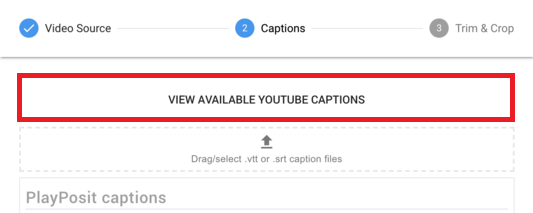
- From here, you can either drag and drop caption files directly over the dialog menu, or click View Available YouTube Captions to retrieve existing caption files for that stream.
 For full instructions on fetching YouTube captions, click here.

 For full instructions on fetching YouTube captions, click
 To learn more about how to set your captions to autoplay in your Bulb, click here.
Note: We recommend checking all .srt and .vtt files with a srt checker before upload so any formatting errors can be caught that could affect playback. A recommended online checker is https://subtitletools.com/srt-cleaner.
5. Once captions are fetched or uploaded, you may use them in the player. When previewing a bulb in the player, select the captions you would like to use by clicking the Settings Gear.

6. Select the captions you would like displayed from the dropdown.
 Note: Captions uploaded from a .vtt or .srt file will appear in the drop-down under the chosen file name and will display in the bulb viewer.
Edit captions
If a caption file needs to be edited, follow these directions.
- Inside the designer, click the Video Segments tab and select the video.
- Click Captions then the caption file drop down to edit.

- Click the pencil icon.

- The captions editor will open in a separate tab. Click the line of the caption file that needs to be edited and edit the text.

- After editing the captions file, click Save Captions.


Trimming and cropping video
If your video is too long or covers topics that aren't relevant to you, you can either trim the beginning and end or add internal crop segments.
- Switch to the Video Segments tab.
- Click the Pen icon for the video you want to caption and select Edit Video Segment.
- Click the Trim & Crop tab.
- To trim video from the beginning and end, drag the first set of red and green handles, or click Advanced and type in the exact timestamps you want to trim the video to. Note: For accurate crops, please us the timestamps in the video player below.

- To add internal crops, click Advanced > Add Internal Crop. You can then drag the new sets of red and green handles that appear, or type in the exact timestamps you want to trim the video to. Note: Configure crops using the timestamp in the video player below.

- Click Done to save your changes and close the dialog.


Changing a video source
If you want to replace a video segment that you have already added:
- Click on the thumbnail of the video segment you want to replace.

- Click the dropdown menu above the video preview. (It may read something like "Current YouTube video)

- Choose your new video source.


All interactions which you have already added will be preserved when you change the underlying video source.
Change a video name
Change the name of a video in a bulb to organize different sections of the bulb.
- In the designer, select the video in the Video Segments tab.

- Under the Video Source tab, edit the Title section to change the video's name.

- The video title will appear in the designer and on the player in the Review tab.


Note: When the title of the video is changed, it will not impact other bulbs using the same video.
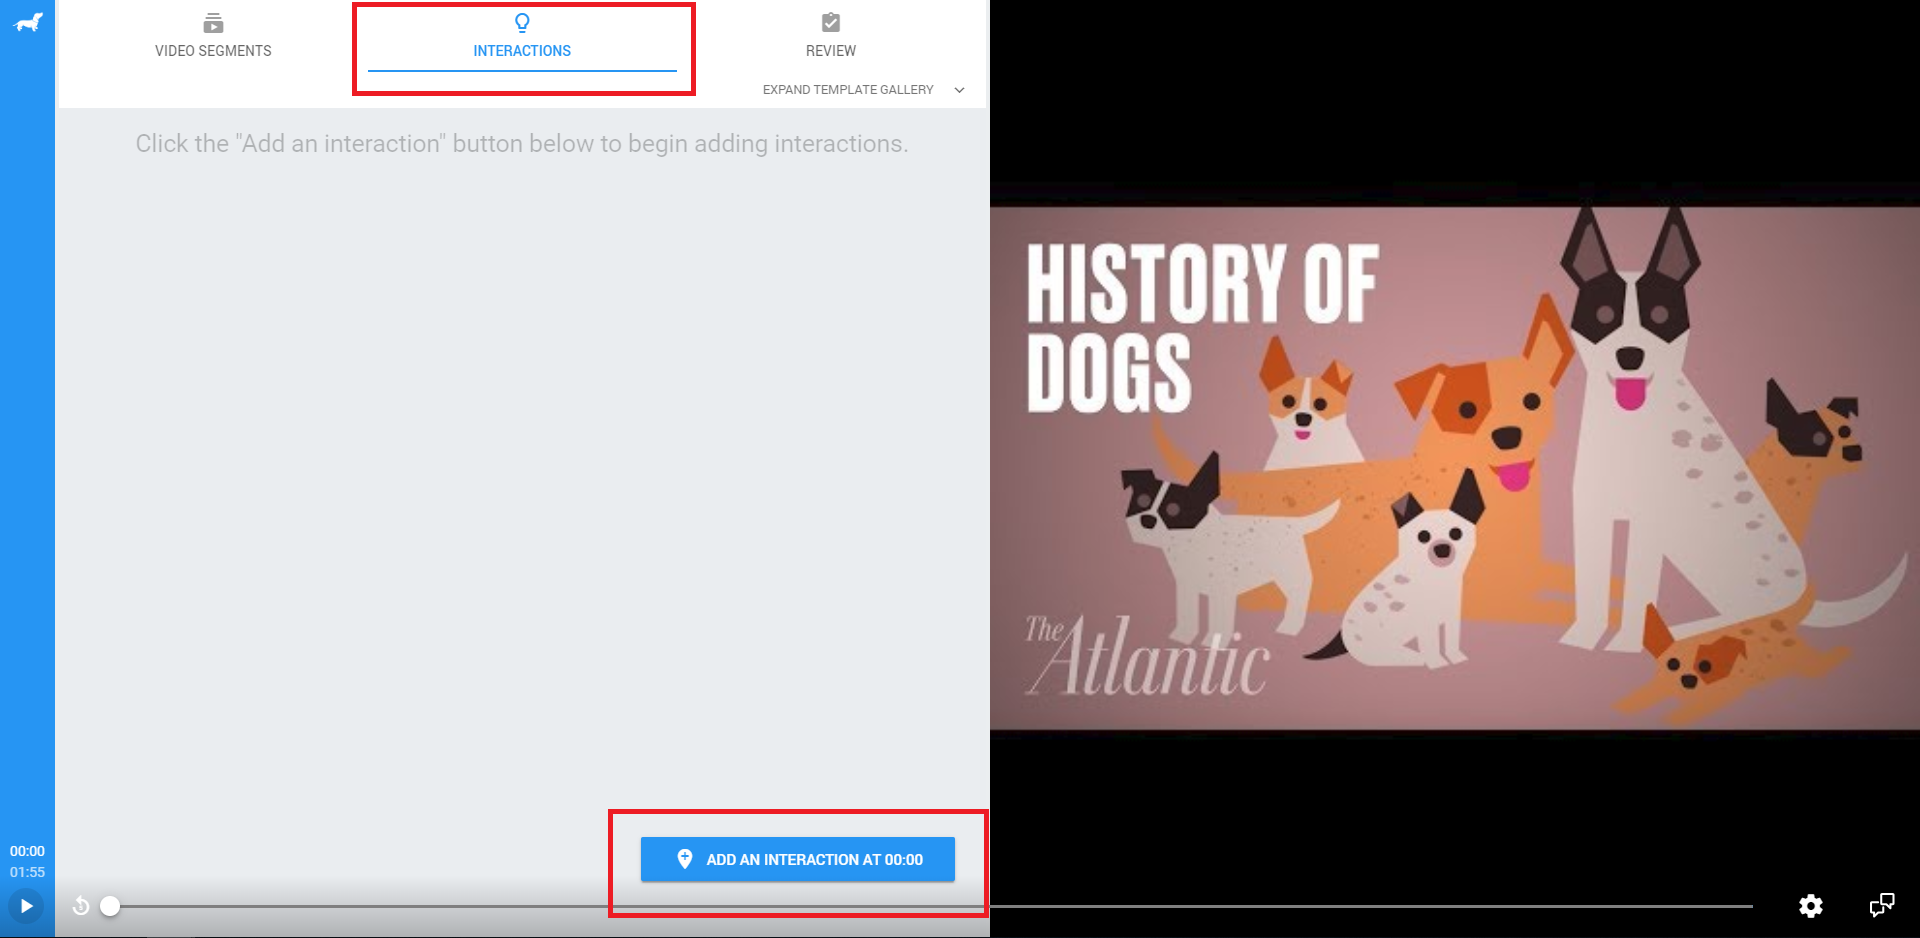
Insert interactions
To insert a single interaction, switch to the Interactions tab, and click Add an Interaction.
Types of interactions

PlayPosit offers 10 different types of interactions, each of which can be customized in a variety of ways:
- 1
- Multiple choice: Present learners with a series of options to choose from in response to a question. This question type has one correct answer and is auto-graded.
- 2
- Check all: Present learners with a series of options to choose from in response to a question. This question type can have multiple correct answers, but students will only receive full credit if they select all of the correct answers. This question is auto-graded.
- 3
-
Free response: Allow learners to demonstrate understanding with a text response and/or use the rich text editor to include images, audio, equations and tables. This question type can be manually or automatically graded. Note: If learners are using symbols such as < or >, please tell them to add a space before and after so that it is not interpreted as an HTML tag.
- 4
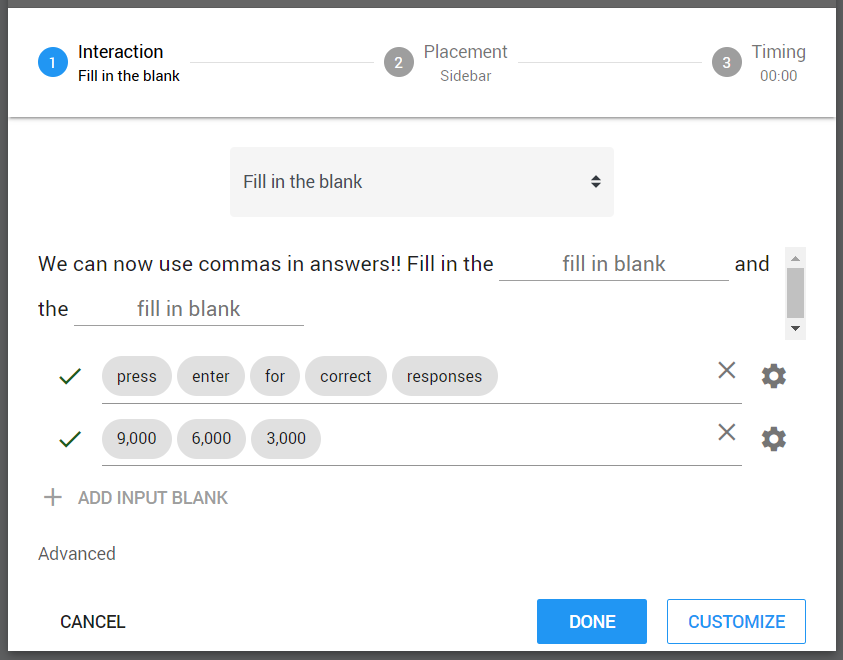
- Fill-in-the-blank: Present learners with a phrase that is missing one or more words. Questions can have multiple blanks and multiple correct answers. Please press Enter/Return to separate each correct answer for the blank. Responses are not case sensitive. Learners can receive partial credit for their answers, and this question is auto-graded.
- 5
- Reflective pause: Give learners the opportunity to pause and reflect on video content. Alternatively, use this question type to supplement information that is not covered in the video, or make connections between the video content and other course material. This interaction is not graded by default, but you can change the point value if desired.
- 6
- Web embed: Allow learners to explore a website without leaving the video lesson. Use this to provide supplemental information to students or have them complete an online simulation. This interaction is not graded by default, but you can change the point value if desired.
- 7
- Polling survey: Present learners with a series of options to choose from in response to a question. Learners can only choose one option or multiple options, and there is no right or wrong answer. This interaction is not graded by default, but you can change the point value if desired.
- 8
- Discussion forum: Simulate an interactive discussion with this question type. Learners can post responses in real time and/or reply to comments posted by other students. This interaction is not graded by default, but you can change the point value if desired.
- 9
- Table of contents: Creates an outline of your bulb in the sidebar. The video segments and interactions in the bulb will be listed in the table of contents. Please see this article for more information about creating the table of contents.
- 10
- PDF file: Upload the PDF file from the device or import the PDF file with the link to the Bulb as an interaction. Learners can use the built-in tool to add comments, highlight text, and draw on the PDF file. These annotations will also be exportable for learners when they download the PDF file from the Bulb. This interaction is not graded by default, but you can change the point value if desired.
Note: The Table of contents interaction type is only available to school users at this time. Free and Pro users cannot use this type of interaction. Please contact your account manager for more information.
Interaction templates
Interaction templates are a quick and easy way to add pre-formatted interactions to your bulb. They can be found by clicking Add An Interaction and scrolling down to the bottom of the menu. Please see the Interaction templates article here for more details.
Template gallery
The template gallery contains bulb templates that apply either multiple interactions at the beginning, middle, or end of your bulb, or durational interactions throughout its length. It can be accessed in two different ways:
- After adding a video segment, select Apply Template.
- Select the Interactions tab and click Open Template Gallery.
See this article for more details.
Adding feedback to the answer options
To add feedback to answer options for multiple choice, check all, polling survey, free response, or fill in the blank interactions:
- Click the gear icon next to the answer choice and select Add Feedback.

- Type out your feedback.
- Click Done to close the dialog.

Using interactions strategically
- Adding a reflective pause interaction to the beginning of a bulb is an effective way to keep learners engaged. It is a good opportunity to include directions on how to watch the bulb.
- Click on the triple dots icon for the interaction you want to edit.

- Click and drag the slider next to the point value (10 points maximum)
- Click the gear icon next to the specific answer option and select Add Jump.

- Drag the slider or type in a specific timestamp.

- Click Done to save and exit the interaction dialog
- Click Advanced at the bottom of the interaction dialog
- Check one or both of Jump if the user answers this question correctly and Jump if the user answers this question incorrectly.

- Drag the slider or type in a specific timestamp.

- Click Done to save and exit the interaction dialog.
Click on the interactions tab to add a reflective pause.

Then, click Add and interaction at 00:00.
Then, click Pause to create a reflective pause interaction at the beginning of the bulb.
Add instructions on how to use the bulb in the reflective pause to encourage students to watch the entire bulb.

When is the right time to use durational interactions?
Durational interactions are useful for sections of the bulb that require a visual aid.
For example, if an instructor wishes to quiz the viewer during the 20 seconds when a specific topic is being covered, the presenter can insert a durational discussion interaction lasting 20 seconds. This type of interaction will not pause the video in the same way that a standard discussion interaction does.
To add a Discussion interaction, click Add an interaction at 00:00, then click Discussion.
Click Placement and then click any placement for the interaction.
Click timing and then click advanced.
In the advanced menu, type in a Start and End time for the interaction.
Note: If the start and end time of the interaction overlap with other interactions, they will be grouped with the durational interaction.
Embed images, audio, attachments, equations, and tables
You can use the rich text editor to add images, audio, equations, tables, links, and more to any interaction. Clicking any editable text area opens the rich text editor toolbar.
Click the triple dots icon on the toolbar to expand it and show more formatting options for the text.

Click the Insert button to view advanced options, including options for placing web links and source code.

It is also possible to directly edit the HTML of an interaction. Click here for more information on what HTML tags are allowed and how to edit them.
Note: Attachments can be added to an interaction if you are part of an institution with this feature. Admins for institutional licenses should contact their account manager for more information.
Attachments can be added by clicking the paper clip icon in the rich text editor and then selecting a file from your device to upload (max file size is 25 MB). All file types are supported except for audio, video, and images.
 After uploading the attachment, you will see a chip with the name of the uploaded file appear in a new section below the text entry section, under Attachments. If you need to delete the attachment click the x button on the chip.

Attachments can be placed in an interaction description, answer, or feedback options. 


When a learner takes the bulb, they will see the attachment appear in the interaction. They can click the attachment icon to download the file directly to their devices.
To add an equation to an interaction, click the equation button.  The equation editor will open in a new tab.
Click the Equation (LaTeX) editing box and enter the desired equation.
Make sure to enter the equation's alternate text into the label box so screen readers can read it out.
Click Ok to finish entering an equation into the interaction.
Note: In a discussion forum the rich text editor will display a new emoji button on the left hand side. 
The emoji button will give learners or instructors the option to insert emojis into comments.


Change the point value of a question
By default, when you create new interactions, the Designer automatically sets them to be worth the same number of points as specified in your profile. However, if you want to change the point value of an individual interaction, you should:

Advanced interaction settings
Please also see this article for more detailed information about the advanced interaction settings.
Certain interactions have more advanced features available, all accessible by clicking Advanced under the interaction.
Partial credit
When you check " Learners can earn partial credit" on a fill-in-the-blank question, learners will receive points for each blank they get correct.
When you click Done, the interaction will update to reflect the exact points that each correct answer is worth.
Jumps
If a learner selects a specific answer, or if they get a question right or wrong, you can jump the learner to a different point of the video. PlayPosit offers additional Jump functionalities that enable instructors to provide a branched learning experience. Click here to learn about Auto Jumps, an additional way to utilize the Jump functionality in PlayPosit.
To add a jump to specific answer options (multiple choice, polling survey):


Otherwise, to add a jump if the learner answers a question correctly or incorrectly (fill-in-the-blank, check-all):


If you want to jump the learner forward in a bulb, you must enable fast-forwarding in Bulb Settings, and all intermediate interactions (i.e., between the original interaction and the jump destination) must be set to not required. Similarly, if you want to jump the learner backward in a bulb, you must enable rewinding in Bulb Settings. Click here for more information.
Interaction placement
When adding interactions to the bulb, they will display in the sidebar by default. However, instructors can adjust the placement of interactions to overlay them on the video or create hot spots on the video. Please see this article for more information about adjusting interaction placement.

Timing
By default, when you add an individual interaction, that interaction will appear and disappear at a specific time in the video. However, you can set it to be visible for however long you want if, for example, you want to show an annotation over the video for a while, or let your students use the video as a resource to answer a question.
To adjust a question's timing, open the interaction and click Customize twice, or click the timestamp to the left of the interaction's triple-dot icon.

Next, click Advanced to expand the advanced settings, and enter the desired start and end times.

To obtain the exact timestamp in the video where an interaction should appear, click on the timestamp in the lower-left corner of the screen. This will automatically copy the current timestamp. Then, paste it into the interaction.

Retries
By default, students can only attempt each interaction once, but teachers can set individual interactions to have up to ten retries, or unlimited retries. This is supported for multiple choice, check all, polling surveys, free response, and fill-in-the-blank interactions.
To enable them, open up an interaction, click Advanced, and then check the box next to Allow more than one attempt.

Drag the slider to the number of attempts that you wish to enable for that interaction.
Manually graded discussion forums
By default, when a learner submits a comment to a discussion forum that is worth points, they will automatically receive full credit. However, it is possible for instructors to configure discussion forum interactions so that they are manually graded; i.e., learners will not receive credit until the instructor views their response in the bulb gradebook and manually assigns a point value.
- Click the triple dots icon on the discussion forum for which you would like to enable manual grading.

- Select Edit.

- Click Advanced.

- Uncheck the checkbox labeled Learners automatically earn full points on submission of comments.

- Click Done.


For more information on manually grading discussion forums, click here.
Randomized answer order
To prevent cheating on certain interaction types, you can set answer options to display in randomized order each time. This is supported for multiple choice, check all, and polling surveys
Show feedback for unselected correct answers
Note: This feature is available for all institutional users.
When you add a check all interaction, you can choose to show feedback for unselected correct answers.
1. Add an interaction with multiple correct answer choices and feedback.
 2. Click Advanced and then check Learners see feedback for unselected correct answers.
 3. When a learner takes the bulb they will see other correct answers displayed with custom feedback if they do not select all the possible correct answers.

Only show feedback on last attempt
Note: This feature is available for all institutional users.
You can configure a multiple choice or check all interaction to only show answer feedback when the learner has no remaining attempts on the interaction, or show feedback after every single attempt.
1. Create an interaction with feedback in the answer choices.

2. Click Advanced, check Allow more than one attempt and Only show feedback on last attempt.

3. When a learner answers an interaction, they will see feedback displayed after their last remaining attempt if they answer incorrectly. If Only show feedback on last attempt is unchecked, then the learner will see feedback displayed after every attempt.

Never show correct answer
Note: This feature is available for all institutional users.
You can configure a multiple choice, check all, or fill in the blank interaction to never show answer highlighting. This means the learner will not be informed of whether a response is correct or incorrect.
- Create an interaction and select the correct answer choice(s).

- For Check All and Fill in the Blank, under the Advanced options, select Only show answer highlighting on last attempt and select Never show answer highlighting. Choose any other options then click Done.
 Learner view:
- For Multiple choice, under the Advanced options, select Hide correct answer if not selected and choose to Never show answer highlighting or keep it unselected. Determine any other options then click Done.


 Learner view:

Learner view: 
Note: If Never show answer highlighting is selected, learners will not see highlighting for correct, incorrect, or missed answer selections. They will also not see the points earned or points available. Learners will only see a pop up notification that confirms their answer has been submitted.
Dark Mode
In the designer, create a Multiple choice, Fill in the blank, Check all, Reflective Pause, Poll or Free Response interaction.
Select Placement. 
Place the interaction in the video frame. Once you do this, the Advanced settings will appear. 
Select Advanced and toggle on Dark mode. Adjust the Opacity slider or type in the percentage. When finished, click Done. 
Allow learners to upload attachments
This setting is only available for free response interactions. When this option is selected, learners can upload attachments to their answers. The max file size is 25 MB. All file types are supported except for audio, video, and images.
Instructors should navigate to the monitor page to review learner-submitted attachments. Click here to learn more about monitoring Bulbs in PlayPosit.
Allow learners to upload videos
This advanced feature is available for free response interactions and discussion forums. Please note that institutional licenses must include HLS video uploading for this option.
After a free-response or discussion forum is added, select Advanced, then check "Learners can upload videos when answering this interaction."

Stack questions together
When you add an interaction, it usually appears as a stand-alone interaction. However, it is possible to set interactions to display in a group, so that your students must answer a series of questions before they can continue watching the video.
 On any interaction (depending on whether or not it's already in a group), you can click the triple dots icon to:
- Add Interaction Before or Add Interaction After - Add a new interaction before or after the selected interaction, effectively creating a group of interactions.
- Separate From Group - Remove the selected interaction from an existing group so that you can edit it individually
- Move Interaction Back or Move Interaction Forward - Move the selected interaction earlier or later in the group so it displays sooner or later.
At the bottom of an interaction, select Add interaction to group to stack an interaction.
Bulb settings
If you click the Review tab, you will see a number of bulb settings you can change that will affect the way your bulb plays back and displays to other instructors and learners taking the bulb.
Access the Bulb Settings help article to learn more.
Bulb details
Access the Bulb details by clicking on the Bulb thumbnail or triple dot menu, then select Bulb details. Click here to learn more about what information is found in the Bulb details.
Previewing a bulb
It is possible to preview a bulb as either an instructor or a learner from the PlayPosit Designer. Previewing a bulb as an instructor will allow the viewer to fast-forward to any point in the bulb, as well as to skip questions. Previewing the bulb as a learner will restrict the viewer to viewing the bulb as a learner would, essentially defaulting to the bulb's built-in playback settings. It is possible to switch between the two previews at any point in time.
On the first launch
In the Review tab of the designer, click the Preview button. This will open a new tab containing a player preview.

When the player first loads a bulb preview, a toast will appear in the top right corner of the screen.

Selecting "Toggle Playback Mode" will open the settings gear menu, which will allow you to choose your preview mode

Instructor preview
In the Review tab of the designer, click the Preview button. This will open a new tab containing a player preview. By default, clicking Preview will open an instructor preview of the bulb, but the following instructions will show how to switch back to an instructor preview.
- Click the Settings Gear in the bottom right.

- Then, next to Playback Mode, select Instructor from the dropdown menu.


You will now be able to skip to any part of the bulb and skip any questions that arise.
Learner preview
- Click the Settings Gear icon in the bottom right corner.
- Select Learner from the dropdown menu labeled Playback Mode.


You will now see the bulb the same way a learner would, which is determined by the bulb's playback settings.
Note: If you are switching from an instructor preview to a learner preview, and had previously skipped any required questions, the player will jump you back to the first unanswered question, regardless of your progress in the video.
Player controls

To change the controls display of a player, click on the Settings Gear icon in the bottom right corner.
There are two Controls Display options.

- Always: The player controls will always be displayed at the bottom of the player. This is the default selection.
- Fade: The player controls will disappear after 5 seconds of inactivity.